

Welcome to my digital home! There are lots of articles you might find helpful buried in this site on topics such as modifying an Alfa Romeo 159, rebuilding a Lotus 7 (Robin Hood 2B), not to mention a ton of stuff on technology in general. It’s all here somewhere, so use the search function or navigate using the menu structure. if you want to talk, reach out via the contact function, I usually do answer!
Random Post Selection
RH2B Build DiaryBy far the biggest fix that needed to be handled was the suspension. The ride was crashy, wooden and showing its age. I knew this when I bought it, and it was always on the cards to be sorted before summer, so I got stuck straight into it in the spring. After ordering a ton of parts (bushes, ball joints, bolts and not least a shiny new set of GAZ adjustable Coilovers) it was time to get dirty!
The old suspension
This was no small task. Starting at the back of the car, the original sierra setup was in use. separate shock and spring, with a few spring spacers in to stop it hitting the frame! That needed to go and be converted to coilovers so I spoke to KitSpares, the company that originally made the RH2b (Great British Sports Cars) and got some advice. Fortunately they made a conversion kit for this which was essentially a couple of metal brackets so i bought the parts and set to work.
Parts required to convert the rear end.
It was remarkably easy to do and took no time once I had everything stripped down and prepped. For the most part, the longest time was spent prepping materials with paint and rust proofing everything that was looking worse for wear. All exposed metal was either painted, or treated with BitHamber Hydrate 80, my favorite rust proofing agent!
BitHamber Hydrate 80 doing its thing!
Once everything was prepped, cleaned, hydrated, painted and ready, it was a simple assembly to get it looking like new!
Fresh and sporty!
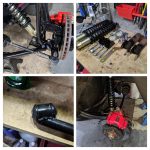
Once the rear end was all sorted out it was onto the front end. This was the real mess. Old Spax coilovers with paint chipping off while everything else was hand painted in what looked like textured hammerite! and I do mean everything, bolts, bushes, the lot!
Not a pretty sight!
Along with some interesting choices in paint came an interesting choice in bush modification. The suspension used circa 1990 Vauxhall Astra bushes, but the builder had litterally hack-sawed them shorter to get some caster adjustment. The result was a messy mix of jagged bush, spacers, washers and well…. shit.
This was not going to do at all so it all came off and was stripped back to bare metal before being sprayed in Auto-K Black Calliper paint. I love this paint because it self levels, requires no primer or top coat, is resin based and hardens. Its ideal for metal bits like suspension IMO!
Complete OSF suspension setup stripped back to bare metal (this was not fun to do!)
Painted and ready for assembly!
Once painted I installed new bushes, new track rod ends as well as new upper and lower ball joints. This was what was needed to get the feeling back in the ride and sort the old girl for many years to come!
Painted, refreshed and looking like new!
Along the way, I replaced far too many bolts that were not the right size or spec which was slightly concerning. Why you would use a mild steel M8 bolt when it should be a stainless 8.8 M10 I have no idea, but when I found it wrong, it got put right!
Of course the 3D printer came in handy along the way. Firstly to print some custom designed flexible mounts for the cycle wings to stop them rattling, and then to print some custom bolt caps with a Lotus 7 logo in. I mean, if you can, you should right?
Flexible Cycle wing mounts printed in TPU
Some of the many Bolt Caps I printed in ABS
All in this particular modification / improvement has taken me just short of 3 months, but that’s mainly because I took my time and made it right!
Related Images: [...]

InfoSecThis is a short video explanation of how the UK Cyber Security Challenge’s launch cipher was put together, and subsequently how to break it!
C4Odla8I0Hs
Related Images: [...]
InfoSecSo I finally got round to sorting out the heat issues associated with running the 1W ALFA at full power for extended periods of time. It was a simple hardware mod that cost next to nothing to do and it means I can run higher power for longer, which is useful 🙂
Ok, so starting from the top….. Your going to need an ALFA USB RT8178 external Wireless adapter, rated at 1W. You want the 1W one not the 2W or N spec etc ones as they are different chip sets and the best chip set for wifi pwnage is the 8187 🙂
Once you have your trusty ALFA card your going to want to overclock its power to make it see where other cards cannot. That is as simple as typing:
ifconfig wlan0 down
iw reg set BO
ifconfig wlan0 up
iwconfig wlan0 txpower 30
Once you have full power enabled however, your going to start running into problems unless you modify the hardware as well. That’s where this guide comes in!
What you will need:
ALFA USB RT8187 Adapter
Small chip Heat sinks from Maplin or elsewhere
3M Heat sink double sided sticky pads
Super Glue
Dremil
Sharp craft knife
To start, you need to crack open the unit. It just pops open, but I found that it snapped the clips that hold it together when I did it so you need to be careful or be prepared to super glue it back together.
Once you have it all open and ready to go clean up the chip and the heat sinks with some heat sink paste solvent and heat sink surface prep.
Once that’s done, cut a piece of the heat sink tape to size and attach it to the heat sink.
Then just attach it to the chip and your set for fabrication to commence!
No for the tricky bit. Using your dremil and knife, cut a hole for the heat sink in the face of the case. Its tricky, and mine didn’t come out great, but it was good enough and function over form is good for me on this one!
Now your all set, you can run your ALFA at full power, injecting and sniffing to your hearts content without burning it out.
Enjoy!
Related Images: [...]
RH2B Build DiaryI was hoping when I rebuilt the suspension that the brakes were ok. Well they looked ok, and the car seemed to brake fine so I didn’t think I needed to do anything to them until the winter. Well, turns out that they were a little less than perfect and caused an MOT fail!
According to the Brake test, there was a 46% difference between NSF and OSF, whcih was a bit of an issue! I am a little unsurprised though as during the suspension rebuild, suspending a caliper on cable ties and occasionally knocking it off was more than likely to have upset a 15 year old braided hose! The fix was simple, rebuild both callipers with new seals and pistons, put new brake lines on, and flush the whole system.
Calliper Rebuild Kit
First up was a “Bigg Red” Calliper rebuild kit, cheaper than expected, coming in at £27 delivered! This gave me a new set of seals and a new piston for each calliper. The pistons that came out were pitted so a rebuild kit that included pistons was key. While the callipers were apart is was an ideal time to spray them with my favourite Auto-K Calliper paint, so I set about doing that. While the wife was out one day, I took advantage of the oven and decided to cure the paint to 200c (needed for the paint to harden) off the car and before I rebuilt everything.
My version of a happy meal
Before paint, I put the pad carrier in a vice and filed smooth all the pad glide surfaces to remove many years of corrosion and paint. After I painted them again, I removed the overspray with a file on this area and before putting the pads in coated the entire slide area in copper grease.
Filed pad glides
The new braided lines were supplied by GBS through Kit Spares, and again, were great value for money. A full set (4 lines) was around £60 delivered, which considering they were branded Goodridge and very high quality, is excellent Value for Money. I have only installed the front lines for now as the rear callipers were fine, but i’ll do the rear end in the winter!
Braided lines
The brake fluid was old and had lots of corrosion in it. When I flushed the system through the furthest calliper tons of black floaty bits came out. I am pretty sure this fluid had been in the car for several years! It took about 1.5l of fluid to fully flush & bleed the system, but boy was it worth it.
The final product went back together very easily and an MOT retest showed perfect front brake bias so I cant argue with that! Another job I wasn’t expecting ticked off!
Related Images: [...]

LiveMixesIn honour of the crew @ B-Sides 2013 and @Dantiumpro for developing a cool cipher challenge for the UK Cyber Security Challengers to mess with, I have come out of retirement, fresh for 2013 (all be it a bit rusty!) more to come!Track Listing:
1 Wild One Two (Original Mix) – Jack Back feat. David Guetta, Nicky Romero & Sia
2 Icarus (Original Mix) – Madeon
3 Breakn’ A Sweat (Zedd Remix) – Skrillex & The Doors
4 Quasar (Original Mix) – Hard Rock Sofa
5 Don’t Hold Back (Original Mix) – Starkillers & Dmitry Ko
6 Lightspeed (Original Mix) – Datsik & Kill The Noise
7 Damaged (Main Mix) – Antillas feat. Fiora
8 That’s What She Said (Original Mix) – Joe Garston
9 Let’s Party (Instrumental Mix) – Mat’s Mattara feat Rockman
10 All By Myself (Original Mix) – Dubvision
11 French Rules (Muzzaik Remix) – Sebastien Drums, Niles Mason
12 Mono (Mat’s Mattara, Peruz Mix) – Peruz, Mat’s Mattara
13 Cascade (Original Mix) – Tommy Trash
14 Slash (Original Mix) – Nari & Milani vs. Maurizio Gubellini
15 Toulouse (Original Mix) – Nicky Romero
16 Concrete Angel (Original Mix) – Gareth Emery feat. Christina Novelli
17 Paradise (Fedde Le Grand Remix) – Coldplay
18 Spaceman (Original Version) – Hardwell
19 Flashing Lights (Kid Massive Remix) – Roger Sanchez, Sidney Samson
https://jabawoki.com/wp-content/mp3/Jabawoki_BSides_2013.mp3
Podcast: Play in new window | Download
Related Images: [...]

LiveMixesA fresh mix for you all – Happy New Year!
Track List:
Albin Myers – Time Like These
Robbie Rivera – New Direction
Oliver Twizt – Yo’re Not Alone
John Dahlback – More than I Wanted
Chris Lake – If You Knew
Doman & Gooding Feat Dru & Lincoln – Runnin
Guetta Angello Gerraud Ingrosso Willis – Everytime We Touch
Steve Angello & Laifdback Luke Feat Robin S – Show Me Love
Planet Funk – Lemonade
Kurd Maverick – Blue Monday
Nari & Milani Feat Max C – Disco Nuff
Kevin Bryant – Who You Wanna Be
Empire of the Sun – Walking on a Dream
https://jabawoki.com/wp-content/mp3/Jabawoki_Sunny_Side_Up_25012010.mp3
Podcast: Play in new window | Download
Related Images: [...]

GeneralI decided to write this how-to as there are no specific guides on Ubuntu 8.04 LTS for the net-4501, and it took a combination of configs from two completely different approaches from two separate guides to get it all working.
I have found that the easiest way to build for the target platform of the Soekris is to make use of the QEMU emulator, freely available in Ubuntu. It lets you perform a typical installation, the way you would do for any other platform so its less confusing.
That said, there are a couple of slight differences and gotchas that this how-to will cover.
Step 1 – Preparation
Aside from a Soekris device you will need a CF card, whatever size you require, I tend to use 8GB or higher as they are quite cheap nowadays and a card reader in your host platform. To perform the installation you will need a host platform running Ubuntu. What ever you have lying around, or a VM will do the trick.
Install QEMU on your host platform if its not already installed:
sudo apt-get install qemu
make a build folder and download the Ubuntu 8.04 LTS x86 Server Release into it from here:
mkdir build
cd build
wget http://releases.ubuntu.com/8.04/ubuntu-8.04.4-server-i386.iso .
Once your environment is ready its time to prepare the CF card. As we are going to use QEMU to emulate the platform and allow a typical installation, we dont need to manually create the partitions on the card. All we need to do is ensure that it is 100% empty.
Install your CF Card and if it mounts as a partition, unmount it from the command line:
umount /dev/sdc
NB: you can determine the device it is detected as by running the dmesg command and noting the device it is assigned. It will likely be sdc or sdd as the card will be seen and used as a SCSI disk device.
Now you need to ensure that it has no partitions on it. run fdisk and delete any partitions listed:
fdisk /dev/sdc
The commands you will need in fdisk are:
p = Print partition table
d = delete partition (you will be prompted for a number)
w = write changes to disk
? = help
Step 2 – Installation
Now you have a blank CF card your ready to run QEMU and start the install. This is actually very simple as QEMU can be controlled from the command line, so all you actually need to do is type the following command:
qemu-system-i386 -m 512 -hda '/dev/sdc' -cdrom 'ubuntu-8.04.4-server-i386.iso' -net nic,vlan=0 -net user,vlan=0 -localtime -no-acpi
This will launch a window and present you with the Ubuntu installation program your already familia with.
The only notable option within the installation is when prompted to configure your disk layout, use “Guided” without LVM and use the full disk available. if you use LVM it will add an unnecessary overhead and as the net-4501 is a GEODE Processor with 133mhz clock and 64Mb ram, overheads are not ideal.
Once it has completed its installation, reboot and allow the newly installed OS to boot up in QEMU once more.
Step 3 – Configuration
The one drawback I have found with QEMU is that you cannot copy and paste between the host and guests. This is a bit of a bind, but fortunately there are not a lot of configuration changes to make.
The first major change we have to make is to swap the kernel for one that does not require PAE extensions. To do this, type the following:
sudo apt-get install linux-image-generic
Now we can configure the serial port listener using your favourite editor (vi, nano etc.. I prefer vi so will use that in the commands):
vi /etc/event.d/ttyS0
start on runlevel 2
start on runlevel 3
start on runlevel 4
start on runlevel 5
stop on runlevel 0
stop on runlevel 1
stop on runlevel 6
respawn
exec /sbin/getty ttyS0 115200
Next we need to configure grub to use a serial port:
vi /boot/grub/menu.1st
Somewhere near the top of the file add the following two new lines:
serial --unit=0 --speed=115200 --word=8 --parity=no --stop=1
terminal --timeout=5 serial
Now, find the line that looks like this:
# defoptions=quiet splash
and change it to look like thgis (keeping the hash):
# defoptions=splash console=ttyS0,115200
Finally we need to load some modules early on or it wont be able to use the CF as a disk to boot from:
vi /etc/initramfs-tools/modules
Append these lines to the bottom of the file:
ext3
ide_generic
usb-storage
The last thing to do is to force an update of the changes we just made so run the following commands:
Update-inintramfs -u
update-grub
For good measure you can always run:
apt-get update && apt-get upgrade
but it is optional 🙂
Now all that is needed is to power off the QEMU instance:
poweroff
and remove the CF card from your host.
Step 4 – Finishing up
The final thing to do is to sync the baud rate of the Soekris device to the baud rate we have used in the configs. By default the Soekris is set to 19200 baud, but we have used 115200 baud in teh configs to make things a little better to work with. We need to sync these for ease of access later on, so first open up your preferred terminal application and connect to the Soekris at 19200, with no CF card installed.
At the boot prompt type:
set conspeed 115200
Once this is set, you can power down the Soekris, install the CF card in it and boot it back up. It should boot to a prompt quite happily and your ready to configure your new embedded Ubuntu device however you need 🙂
Enjoy!
——————————-
FAQ Section:
Q: Why are you using 8.04LTS and not a more recent release?
A: As of 10.04, Ubuntu dropped support for all 486 and older style CPU’s on the premise that most people would have modern computer systems. This is a deviation from the ethos of Linux in my opinion, but it was their choice to make! I have spent weeks trying to build later versions of Ubuntu on the 4501 platform, and have built custom kernels with the right modules etc, but have NEVER had success. Your welcome to try though 🙂
Related Images: [...]
GeneralWell, after the change of room size the RP6G2’s lack of low frequencies eventually pushed me to go the extra mile and get the KRK10s. Initial feedback on it? Its got so much bass! I know that’s the whole point of it, but wow, I like bass and even I struggle with this sometimes. So much so that I actually bought the Boss FS-5L latched foot switch so that I could bypass the sub from time to time and allow the full range of frequencies back to the RP6G2’s!!!!
So….. what does all this mean?
Well, first off the KRK10s is one hell of a good sub, well built, sounds great and can really pump out some power, so much so, it rattles all of the radiators in every room of the house when its wound up! that said, it more than matches the RP6G2’s and compliments them well. The unit itself acts as the hub of your system, so you route your main outs to the unit from your source, then plug each of the other 2 speakers into the sub. My preference for this was to use TRS Balanced Jacks from my mixer to the Sub, then XLRs from the Sub to each speaker. A good, cheap cable provider I use regularly is: Vision Sounds on eBay, they are quick to process, cheap to buy and decent quality, so that works for me!
The KRK10s comes with a built in Crossover, with a knob on the back to set the Crossover frequency. I have played with this for a while now, and for me, I find that the best option is to keep some of the bass going to the RP6G2’s and let the sub handle the low stuff. To that end, I tend to have my crossover point at around 50Hz, which lets the RP6G2’s handle the punch in a beat while the KRK10’s handles the roll. I find this approach keeps the imaging better in my opinion.
The built in amp comes with the same +-6db of gain through a control knob on the rear. Mine is set to -4db and that still, on some tracks and sources, overpowers the RP6G2’s at 0db gain! For this reason, I find that it is very useful to have an EQ of sorts in the mix so you can compensate for different sources. I make use of an Alesis MultiMix8:Firewire to bring each of my audio sources together, which gives me a low/med/high EQ on each channel (except the Firewire output, but that’ a whole different article!).
The final, but very useful feature that comes with this unit is a bypass ability. You can plug in any latch-able foot pedal, but the Rokit site recommends the Boss FS-5L. I have the FS-5L and agree with them, its well built, but not so hard a switch that you can’t use it by hand if you want it on your desk. The reason for the bypass is actually quite a good one. Sometimes, you need to remove the bass effect of the sub and revert back to just the bass of the RP6G2’s. To do this without a bypass and making use of an EQ, you would taint the bass feed to the RP6G2’s and actually not give an accurate image, however, the bypass, when engaged, simply kills the Sub, bypasses the EQ and outputs a full range signal to the RP6G2’s leaving you with a nifty way of getting an accurate frequency reproduction for those absolute moments of audio clarity!
If your seriously thinking of adding a KRK10s to your setup, here are some tit bits of advice for you:
Buy the Boss FS-5L Latched Foot switch at the same time to give you the ability to bypass the sub easily when needed
If possible put at least a basic 3 band EQ between your source and the entire setup, as the ability to gently retard the bass is very handy
Make sure you have no neighbours attached, above, below or to the side of you, or you will quickly make some new enemies!
All in all, I am genuinely blown away with my overall investment into the Rokit camp, and will happily pick up an ERGO when funds can justify the £500 price-tag!
KRK10s Specs:
225 Watt (peak) Powered Sub woofer for Studio Use
SPL: 110dB Music and 113dB Peak
10” High-Excursion Glass Aramid Composite Woofer
Frequency Response: 34Hz – 50Hz to 130Hz Variable (+/- 1.5 db)
Variable and Sweepable Low Pass Filter
80Hz High Pass Filter
Radically Curved Front Baffle Design for Amazing Performance
Front-firing port provides low frequency extension without boundary coupling
Bypass Control using Standard Foot switch
Related Images: [...]
InfoSec……can be reverse engineered by mankind.
Its a simple mantra, but one that has served me well in security.
Think of of this way, it doesn’t matter how intelligent you are, someone, somewhere is more intelligent! When it comes to security this is never more true. As we all know, security is asymmetric, in so much that the effort required to secure something is significantly more than that required to break into it. Given this point, it makes the mantra even more relevant! If security was symetrical, you would have a 1:1 effort relationship, however, as its not, (we will for the purposes of this article assume its 2:1, i.e. double the effort required to secure), it would theoretically take less brain power than it took to create the control to break it.
Obviously I accept that this is a very simplistic representation of the point, but one I think is valid.
Related Images: [...]
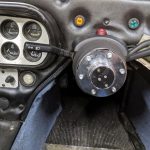
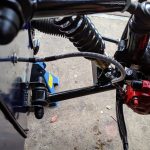
RH2B Build DiaryAfter first getting into the Hoody, I realised that I would have to modify the steering column mounting position as I was just too big for the seating position that had been set by the original builder.
Factor in the new seats and the larger steering wheel, and this became pretty critical to me being able to drive it again! The steering wheel mounted to a steel plate hung off a chassis cross member, with a brace bar back to a side chassis rail. Moving it was as simple as drilling some new M10 holes in that mount point a little higher up, and then attacking a lot of metal with a die grinder until I had sufficient clearance to get the column up an inch!
A little more leg room.
Its often the easiest of changes that have the biggest impact. For instance being able to take your foot off the clutch while turning a corner seemed pretty useful to me 🙂
ready to grind!
One issue I found was that due to the mk1 centre clocks, I was unable to engage main beam anymore (left stalk pushed forward), however this is a temporary issue as I intend to design and 3dprint a new stalk that has an extra long bend in the middle to gain me the additional half an inch of clearance I need to get that function back. The future is now!
Related Images: [...]