

Welcome to my digital home! There are lots of articles you might find helpful buried in this site on topics such as modifying an Alfa Romeo 159, rebuilding a Lotus 7 (Robin Hood 2B), not to mention a ton of stuff on technology in general. It’s all here somewhere, so use the search function or navigate using the menu structure. if you want to talk, reach out via the contact function, I usually do answer!
Random Post Selection

InfoSecThis is a brief interview about my role and the assessment process designed for the challengers playing the UK Cyber Security Challenge while at the Cyber Camp 2012:
Related Images: [...]

GeneralThe Problem:
Ok, so anyone who has worked with sound equipment before would have been greatly disappointed shortly after taking the M-Audio Xponent out of the box. Essentially, it’s a bit crap. The main bug-bears are the faders, often referred to as being made by “Fisher Price”.They are loose, and generally feel nothing like a proper mixer, so anyone used to using pro audio equipment is going to feel short changed (I know I did!). That said, once you get over them, and there are some tricks you can apply to make them feel less annoying, the other primary bug-bear is Torq. This software can only be described as an epic fail! I gave it a shot, I persevered with it for a long time, and have come to the conclusion that its beat detection engine was programmed using chaos theory.
I have mixed on many different platforms, decks (belt and DD), CDJ’s (from first gen to modern) and midi software from TraktorScratch V1.0 through to the usual suspects of today. What all of these platforms allow you to do is beat match with little effort if you’ve got a good ear. Torq on the other hand, seems to want to fight this process and in my own experience, creates a clinical/harsh environment to align beats without getting nasty overlay (beat on beat cancelation). If you persevere I am sure you can personally compensate for this and actually become good at “mixing with Torq” but IMO I don’t think it appropriate to change my mixing style after 20 years just to accommodate crap software.
This problem brings us to the solution I have discovered. I don’t take credit for pulling this together, many people better than me have toiled long and hard to make this work and have done some excellent work on the subject. All I wanted to do was have a rant, show you how easy it is to make the Xponent better and then credit those who did the work.
The Solution:
Native Instruments have invested a lot of time and energy into refining the Traktor product to what it is today. I have used different iterations of it since Scratch v1.0 (the first ever version) and it just keeps improving! The most recent version is Traktor Pro V1.x, I am using 1.2.4 and it is truly phenomenal. I won’t go into it in too much detail, but will say this much, its intuitive, just like it should be, has some amazing effects available out of the box and “just works perfectly” What more could you ask for?
Of course, Despite the Xponent being a Midi Control Surface and a Sound Card, it’s been locked into Torq to proliferate the spread of the evil program, but, there is a way you can break out of this and turn your midi control surface back into a programmable 2-way midi surface like any other. It’s actually quite simple:
While you switch the device on, press and hold the number 2 Queue button + the Lock Button on the left deck. It’s that simple, hold them till it’s all booted up, and to check its worked, press any button, if it lights up then fades away, it’s not worked and you need to power off and try again. If it does not light up, you’re in business and you have a midi control surface ready to use with any Digital DJ software you want!
At this stage you have a couple of options, start mapping the buttons yourself or grab a map that has already been put together. Personally, I like to short-cut things, so I would grab a predesigned map. After a good look around and a few failed starts, I found a mapping from HolyCT based on the work of DJ Kad listed in the NI Forums. It is amazing! It has all the mappings you would want, full documentation and even a browser mode so you can use the jog wheels to browse your track lists without the keyboard and mouse! It makes use of the X/Y Pad and is IMO a very well put together map for the Xponent.
Bringing the good features from the Xponent to a well written and user friendly piece of software like Traktor Pro, is a marriage made in heaven! I am truly blown away with the usability and playability of the combination, and it has convinced me to stick with my Xponent for the time being. It may not be the best controller in its class, but it has some cool features and once you get used to the faders, it’s not all bad!
Related Images: [...]

LiveMixesMore Progressive sounds for Easter…..
Fatboy Slim vs Koen Grownwvald – Rackafeller Skank (Original Mix)
Felix Baumgartner & Juan Kidd – Now Your Gone (Club Mix)
David Penn & Rober Gaez – Our Darkness (Original Mix)
Funkagenda – Breakwater (EDX Ibiza Sunrise Mix)
Milk & Sugar – Let the Sunshine (Milk & Sugar Global Mix)
Paul Gardner & Hugh Gunnell ft Marcella Woods – Come Get My Lovin (Plastik Funk Remix)
Faithless – Music Matters (Mark Knight Remix)
Sandy Rivera – Whatever (Andy Daniell Digital Edit)
Ou Est Le Swimming Pool – Dance The Way I Feel (Armand Van Helden Club Mix)
Richard Grey – One More Time (Chris Moody Remix)
Kim Fai – Good Life (Original Mix)
TV Rock – In the Air (Axwell Remix)
Young Rebels & Fransico Diaz – 1998 (Original Mix)
Funkagenda – Nobody Listens To Techno Feat. Mc Flipside (Original Mix)
Muzzaik – Going Underground (Original Mix)
DCA Project – Sandcastles (John Dahlback Remix)
Pryda – Waves (Original Mix)
Dankann – Genesis (Original Mix)
https://jabawoki.com/wp-content/mp3/Jabawoki_Easter_Progressive_06042010.mp3
Podcast: Play in new window | Download
Related Images: [...]

Alfa 159Before I even started this project, I spent quite a lot of time figuring out potential box sizes and planning the acoustics of the project. The overall goal was maximum SQ & Power balance with the least boot space loss possible! No mean feet to achieve.
I opted to retain the stock OEM head unit rather than go for an after-market double-din one as I wanted the overall look and feel of the car to remain normal, while improving the audio characteristics and overall frequency response. In order to achieve this I made use of an Audio control LC2i active, line level converter. A unit from the USA that is very special and literally takes speaker level outputs up to 400W RMS and then runs them through a series of electronic clean-up routines to get a perfect line level out for the sub-woofer, than can also be controlled by a remote gain control, and a perfect 2 channel full range output for a mid amp (to be utilised in a further project).
This unit combined with an Infinity KAPPA Perfect 12 VQ (M3D) sub-woofer and an Alpine MRV-420 amplifier I already had was all I needed to put a little boom back into the boot!
” order_by=”sortorder” order_direction=”ASC” returns=”included” maximum_entity_count=”500″]
Related Images: [...]
InfoSecSo here we are again, a few months on, and just when so many were licking their wounds after the last infection, along comes another. Guess what, if you had your eyes shut my sympathy is not going to be that forthcoming!
Malware has come along way since its anarchistic pre-pubescent beginnings, and is now a fully fledged teenager, displaying all the fire, passion and unpredictability you would expect from one. Once upon a time, you could be sure your malware was simple in its intention, written by an unorganised person or persons, with the typical agenda of notoriety or malicious damage. Although bad, quite easy to deal with.
Modern malware however is a whole new ball game. Written to order, with a menu of “features” available from stealing data to placing a sleeper inside the system, all with standard issue mass infection mechanisms anti malware detection programming, the latest in self defence techniques and with the underlying drive of a typically well organised or at least very motivated source.
Yet despite this significant step change in what we are seeing as the attack, as a world of experts I am still not seeing a change in the controls, strategies or defence tactics of many organisations. This I find astounding. How anyone who is considered a responsible person in an organisation can sleep at night thinking that a firewall and a few layers of Anti-Virus is going to cut it as the total form of protection is seriously miss-informed. Equally, those companies out there pedalling the silver bullets of the security world ” ultimate anti-malware solution (TM)” are doing nothing but compound a problem that will continue to evolve and get more sophisticated.
The simple fact is that ANY malware solution on the planet today from any vendor works on the same detection methods. They look for something they have seen before or something that looks like something they have seen before and block it, It’s that simple. And for that reason alone, you cannot rely on that control alone as the only form of defence. Equally, the firewall and all that other perimeter based paraphernalia you invested in, don’t get me wrong, all well and good, but its not going to stop this stuff. Why? Web 2.0, Social Networking, Unified Communications, Chat, Mail, you name it. Any medium of communication that can facilitate the transfer of a file, and that includes just good old browsing of the web, will bring malware to your door, invited in so to speak, through all that perimeter protection, and straight to the desktop.
The truth is, the only way to protect yourself against this stuff is to stop thinking it’s “the good old days” and get with the times. The only way you’re going to stand a chance of surviving one of these incidents is by thinking about the entire control landscape and how they interact with each other. A good model for this is Defence in Depth as that provides a very good method of visualising the controls at each layer of your environment and allows you to map attacks through the controls to see if they would be successful or not.
This simple visualisation strategy can bring value beyond your wildest dreams, giving you the opportunity to stop, think and adjust what you’re doing, justify investment, demonstrate control and rationalise spend. All very important concepts for the times. There is a world of products, vendors control choices and equipment with pretty flashing LED’s on it. The only way to figure out which ones will help you is to understand what you have, what you need and why.
Related Images: [...]
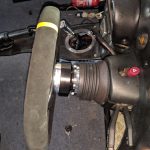
RH2B Build DiaryI had wanted a flat bottomed race wheel from the day I bought the car but other more pressing issues were ahead of the modification! The original wheel was a 280mm (small) 10″ old style wheel that was just difficult to use. It was also so far forward that your legs were right on it so it needed to be modified!
That said, I bought myself a very reasonably priced 320mm flat bottomed suede OMP Racing wheel, a universal quick release boss, and a Momo steering wheel hub to fit the Sierra base. Once I had the parts, it was far more of a mamouth task than I originally thought!
OMP Wheel on quick release boss.
The first problem I had was getting the old hub off. I had to make a bar with a bolt in the center and bolt that to the hub then use the center bolt to push the wheel off the spline. Getting to that point took me the best part of 4 hours!
Once it was off, the new Momo boss went on like butter, and then the back half of the universal boss mated straight to it. Up came the next problem though as the centre horm push was slightly too big to go into the universal boss so I had to modify it and sold the wires on the back of the horn push in order to get it all fitted.
Ready to race!
Once the wheel was installed I had to readjust the toe on the front end to line up the wheel and the wheels, but its going in for an MOT and a full alignment once its back on the road so I am not too worried!
Related Images: [...]
InfoSecI recently was asked by Bloomberg to comment on the raft of Android malware recently discovered. During that interview I mentioned some concepts around the open vs closed models and wanted to expand on this thinking a little further.
As you may know the Google Android platform has been open source since 2008, and as such has a healthy following of developers and an open list of problems that anyone can view and contribute fixes for. Contrary to this, Apple IOS has, and most likely always will be closed and the intellectual property of Apple, and therefore is managed by an army of developers working directly for Apple. Other than these two business models being the polar opposites of each other, the devices themselves do share some common ground, an example of which is they are both based on a *nix base and both allow anyone to develop an application for their platform.
So which is better, open or closed? Both have equal merits and demerits, but for me the key one we need to consider is the security of the applications. Given a smartphone platform is ultimately a portable computer in your hand that you can transition a significant amount of daily communications to, in any corporate environment you need to be thinking about how you maintain the security of that device. For the purposes of this article I am going to discount all the other major security problems with both platforms and specifically look at the apps. To this end I want to create the abstraction between the platforms and the application environments as people seem to confuse these two and blur the lines, and forget that we aren’t talking “open-source” as both platforms are in fact “open-shop”.
If your app store is 100% open, as we have seen with Android, anyone can release any app into it without any form of quality control or security audit. This, as we saw, resulted in a number of applications having more functions that the user subscribed to, and left the devices open to abuse from those individuals that would make money from negative actions. In a corporate environment this means that you have got to control what apps get put on the phone, and create a whitelist and policy enforcement system, which as we all know, we cause the end user to get upset as their freedom of choice is restricted. For the general consumer this means that they, at some stage, will likely end up getting literally robbed blind by their smartphone, because, in an open model, there is no one controlling what gets onto their device for them.
The other end of the spectrum is of course where we are with Apple. Onerous quality assurance, technical and security checks and numerous caveats to adhere to, before your app even gets into the store. But this conversely reduces the risk to business and the consumer equally. In this model, Apple takes control and responsibility for securing the applications on their platform, and minimising the risk to the user. I of course, still would recommend in any corporate environment the use of policy enforcement and approved applications, but you’re at least starting for a better place, and don’t need to do a full source code review of every app your planning to use just to make sure it’s not a Trojan of some kind!
So which model is right?
To be honest, both have their merits and both have their flaws, but I still, personally, favour Apples approach, to err on the side of caution and ensure that the apps they release are 100% up to the task. Let’s face it, developers are known for cutting corners where they can to save a few lines of code, so someone cracking the whip on quality and security can’t be all bad now, can it.
Related Images: [...]
InfoSec……can be reverse engineered by mankind.
Its a simple mantra, but one that has served me well in security.
Think of of this way, it doesn’t matter how intelligent you are, someone, somewhere is more intelligent! When it comes to security this is never more true. As we all know, security is asymmetric, in so much that the effort required to secure something is significantly more than that required to break into it. Given this point, it makes the mantra even more relevant! If security was symetrical, you would have a 1:1 effort relationship, however, as its not, (we will for the purposes of this article assume its 2:1, i.e. double the effort required to secure), it would theoretically take less brain power than it took to create the control to break it.
Obviously I accept that this is a very simplistic representation of the point, but one I think is valid.
Related Images: [...]

Alfa 159This post covers the interior lighting modifications made to my 2008 Alfa Romeo 159 TI.For the exterior LED conversion guide, click here. This modification is worth completing as a single project as the results are a dramatic change in the mood of the interior of the car at night. The original filament bulbs are very yellow so choosing a good LED that puts out a colour range around 6000K changes the feel of the car to a much cooler, relaxed and crisp feel.The parts required to complete this conversion are as follows:
7 x w5w / 501 Type bulbs (all CANBUS) (Puddles, Maps & Glove box)
2 x 42mm FESTOON type bulbs (CANBUS) (Cabin & Boot)
Expected Cost: £35-40
Required Tools: One Bojo trim removal kit “Bojo Bars” (£30) …or a few screwdrivers and a steady hand!
I personally used two of these Festoon type bulbs for the courtesy lights in the front of the car and the boot and four of these 501 type bulbs for the rest of the courtesy & map lights in the front and rear of the car. These were a good balance of brightness and colour, and matched well as I did not want to flood-light the car at night. For the puddle lights and the glove-box I wanted more light so I chose these 501 type bulbs that provided much more light output than the other ones, as these were areas of the conversion that would benefit from more light output.
It is important to understand that the bulbs you use must be CANBUS ready. What this means is that the LEDs have additional resistance added to them that simulates the load of a normal filament bulb so that the cars internal computers do not think that the bulbs are blown. This is due to the fact that modern cars put a small electrical current across the lighting circuits to check that the bulb has not blown, and to report an error if it has, so you know to fix it. While the interior lights don’t report the errors, the circuit still has a small electrical current across it, so if you do not use CANBUS friendly bulbs you will find that some of the lights never turn off and instead stay illuminated (all be it quite dimly) forever!
Here are some images taken from an iPhone, which explains why they look very dark. Its not actually dark at all!
The following expanding links give you the specific guides for each light unit to perform this upgrade yourself:
The front courtesy light is a single unit with several components in it including switches, alarm sensors and the B&M microphone so care is required when replacing the bulbs. The unit itself is held in place with a series of clips down each side that hold it against the roof lining (1a in diagram). You will need 1 x 42mm Festoon bulb (1 in diagram) and 2 x 501 bulbs (2c in diagram) to upgrade this component, below is the removal guide from eLearn:
Like the front courtesy light, this unit is held against the roof lining by a series of clips (1a in diagram). care must again be exercised so as not to damage the unit during removal. You will need 2 x 501 type bulbs (1c in diagram) for this light unit. Below is the removal guide from eLearn:
The puddle lights are located in the base of each front door and provide illumination of the ground when the doors open. They are held in place using a simple clip mechanism (1b in diagram) and are a self contained plastic unit which the bulb sits inside. You will need 2 x 501 type bulbs (1c in diagram) to complete both doors. The guide below from eLearn shows how to remove the units:
The glove box makes use of the same style bulb holder as the puddle lights and requires a single 501 type bulb (2 in diagram). The eLearn guide below shows how to remove it:
The boot light makes use of the final 42mm Festoon bulb (4b in diagram) and is located behind a simple clip on housing (1c & 1b in diagram). The eLearn guide below shows how to remove this:
Related Images: [...]

Alfa 159The final stage was putting all the wiring in place. I opted for 4 gauge cable from the battery up front and a 4 gauge earth in the rear, both connected back to brass 4 way distribution blocks so I could pull 8 gauge runs to amps and the line converter. This also left me the easy upgrade route for adding additional amps to run upgraded mids & tweeters in the cabin, but that’s another project!!
” order_by=”sortorder” order_direction=”ASC” returns=”included” maximum_entity_count=”500″]
Related Images: [...]